Monday, 29 June 2015

Mojo Monday # 404

Hello and welcome to my blog today for Mojo Monday!

I really enjoyed doing last weeks sketch challenge! I had forgotten how much fun they are. This weeks design was clean and simple, but I couldn't help myself; the more I got into it the more I added! 

Here is the Mojo Monday sketch for this week. 


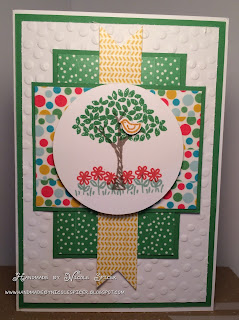
And this is what I came up with!


The supplies I have used this week are as follows. If you click on any items it will take you straight to my online store.

Built for Free Using: My Stampin Blog


I absolutely love washi tape, as you may have noticed! I don't have any of the Bohemian Designer Series Paper yet as I'm waiting on my much anticipated arrival of my BBB (Big Brown Box!) But I think I still like the effect of the washi tape.

Note: I have used a retired product on this card. The Four Feathers bundle is no longer available. But of course this card could be reproduced without the feathers and it would still work.

Thanks so much for stopping by to see my card today for Mojo Monday #404. I hope you liked it and it has given you some inspiration!

Til next time,
Nicole x

Friday, 26 June 2015

BELLO! Another gorgeous Minion!

Hi everyone!

I started a card a couple of days ago (the background of this one...) but then I had a craft block! I knew I wanted to put something in front of the wall, but I just couldn't decide on what!

Yesterday I made a Minion punch art character card and then started to think that maybe I could do a smaller minion popping his head out of the corner. Well, this is what I came up with!


And of course, if you don't speak Banana Language, BELLO means HELLO!

The supplies needed for this card are below and are available at my online store:

Built for Free Using: My Stampin Blog

To make the Minion, here are some measurements. You can change these to suite you too! I just eyeballed it!

Daffodil Delight cardstock
  • 5cm x 9cm for body. Round the top corners with the 1 3/8" circle punch.
  • Scrap pieces for arms.
 Basic Black cardstock
  • Punch flower from Itty Bitty punch set.
  •  0.5cm x 5cm for goggle strap.
  • 4x Cupcake sprinkles from Cupcake Builder punch for eyes (2) and overalls buttons (2).
  • 1" circle punch for mouth cut in half (approx).
  • scrap pieces for hair.
Chocolate Chip cardstock
  • 2 x Medium circle from Owl Builder punch for eyes.
Pacific Point
  • 6mm strips for overalls straps.
  • 2.5cm square for overalls.
  • 3/4" circle punch cut in half for overalls.
Whisper White
  • 2x 1/2" circle punch for eyes.
  • 4 x rain drop from Tree Builder punch trimmed to size on mouth for teeth.
Put your minion together as shown in picture. Colour the rest of his glove in Basic Black marker and a dot with the white gel pen in his eyes. Create some stitching on his overalls to finish him off.

I hope you like my card, as much as I liked making it!

Til next time,
Nicole x

Thursday, 25 June 2015

Minons!

Deciding I wanted to do some more punch art, I went searching for some inspiration, and boy! Did I find it! I took my 3 sons, daughter and 5 of her friends to see The Minons last week. We love the minions! So I thought this one was perfect!

I made this card exactly as the directions from donnas-stampswellwithothers.blogspot.com. He is just gorgeous!


To make this card, you'll need the following items:

Built for Free Using: My Stampin Blog


I hope, like me, you'll give him a go. Well worth the effort! I might have to make a little Minon army now :-)

Til next time,

Nicole x

Tuesday, 23 June 2015

Mojo Monday #403

 
Okay, so its not Monday anymore here, but anyway! I actually got to do some crafting this morning and after I saw the sketch for this week, I was excited! I got a delivery yesterday of a few bits and bobs and was very excited to pull them out and PLAY!

This week's Mojo Monday sketch is....


Can you see why I was excited!? Simple but awesome! Here is what I came up with.


The products I have used today are as follows:

Built for Free Using: My Stampin Blog


  1. Firstly I cut a whisper white piece 9.5cm x 14cm and ran it through the big shot with the decorative dots embossing folder. I then mounted this onto a piece of cucumber crush cardstock leaving a 5mm border. 
  2. I then cut some white pieces to size and then covered them in the washi tape, taking care to not overlap the strips. Then I matted them with the Cucumber Crush cardstock. 
  3. After I stamped the images onto whisper white cardstock, I then cut it out with the 2.5" circle punch.
  4. To assemble the card, layer the embossed piece onto the card base. Adhere the three washi-covered pieces in place and finally the stamped image with some dimensionals.
I quite enjoyed making this card from the sketch provided. It certainly took care of any 'crafting block' that I sometimes get when I really want to create!

I hope you enjoyed my card today!

Til next time,
Nicole.

Saturday, 20 June 2015

Crazy Crafters June Blog Hop - Favourite New Stampin' Up! Products


Welcome to the Crazy Crafters blog hop for June. This month we are excited to show off our favourite Stampin’ Up! products from the just-released 2015 – 2016 Annual Catalogue. We hope you find great inspiration from the projects. Get your wish list ready!

You may just be starting the blog hop here at my blog - Handmade by Nicole Spicer -  or may have come from the person previous to me in the list below. If you get off track at any time, the full lineup below will help you move along from blog to blog so you see all the projects. At the moment you are visiting Nicole Spicer at hop spot # 3.


The blog line up is as follows! 


This week, my oldest child and only daughter turned 11 this week! I can't believe it and I have no idea where that time went! Anyway, I had to make her a card and this is what I came up with. I haven't got to purchase many of the new things on my wish list yet, but I did get to have fun playing with the new stamp set I got called "Build a Birthday". Its a great, fun set.


I started with a square card, something I don't do a lot of! But it allowed me to use the scalloped circle and the largest circle in the circles collection framelits. I love using two circle framelits to create a frame for stamped images.... In this case, a birthday cake using the Build a Birthday photopolymer stamp set. I really love photopolymer stamp sets, it makes life so much easier and quicker!! The banner at the top of the cake was perfect for my daughter because she only has 5 letters in her name!


I finished the card off by added a punched out flower and the leaves I created from cutting off some petals from the fun flower punch, and a pearl embellishment for fun.


Here are the products I've used on my card today:


Thanks for taking part in our blog hop, there are so many amazing ideas and inspiration you don't want to miss. Remember that currently you are at my blog (Hop # 3 - Nicole Spicer) so check the blog hop line up list to see who is next in the list as you don't want to miss out on seeing one blog and the amazing inspiration. 

Til next time! 
Nicole x